![]()
![]()
Dashboard example
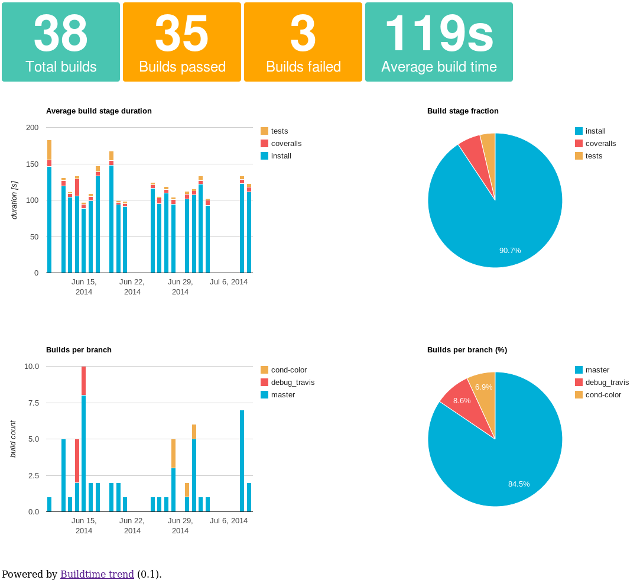 Click the image for recently generated trends.
Features
Visualise trends of build processes on Continuous Integration platforms by gathering and analysing build and timing data:
- Capture timing data from each stage in a build process
- Store, analyse and create trends of the build process data
- keen mode : send timing data to Keen.io and use the Keen.io API for analysis and visualisation
- native mode : store data in xml format and use matplotlib to generate a chart (limited)
- Available charts and metrics :
- number of builds, successful and failed
- average build duration
- duration of individual build stages
- builds per branch
- build duration per time of day/day of week
How to get it?
The latest version is available for download as zip and tarball on GitHub. Unzip and copy to the desired directory.
If you prefer to use git, several options are available :
- development version :
git clone --recursive https://github.com/buildtimetrend/python-client.git - latest release :
git clone --recursive https://github.com/buildtimetrend/python-client.git --branch release - a specific release :
git clone --recursive https://github.com/buildtimetrend/python-client.git --branch v0.2
Dependencies
-
buildtimetrend: Buildtime Trend library
Dependency installation
- using pip :
pip install -r requirements.txt
- if you want to store data or generate charts in
nativemode :
pip install -r requirements-native.txt
Usage
First the timestamp recording needs to be initialised :
source /path/to/init.sh
This script will detect the location of the build-trend script folder,
adds it to the PATH and cleans logfiles of previous runs.
Executing the init script with source is required to export environment variables to the current shell session.
Because the script dir is added to PATH, no path needs to be added when logging a timestamp :
timestamp.sh event_name
This will log the current timestamp to a file and display it on STDOUT. Repeat this step as much as needed.
When all build stages are finished, run
analyse.py
which will analyse the logfile with timestamps and print out the results.
The analyse.py script will calculate the duration between the timestamps and add those to a file with the analysed data of previous builds.
When the analysis script encounters the end timestamp, it will stop analysing the timestamp file and return the duration of the build stages. Possible event names ending the analysis are : end, done, finished or completed.
Optionally timestamp.sh end can be run before analyse.py, but analyse.py adds the end timestamp automatically. The end timestamp can be useful if analyse.py is not immediately run after the monitored build process finishes.
When Keen.io is enabled, the data will be sent to your Keen.io project for analysis.
When run on Travis CI, it will automatically add build/job related info.
Parameter -m native will store data in xml format. It is recommended to use Keen.io to store data, see below for details.
To generate a graph from previous builds, run
generate_trend.py
It will take the file with analysed data generated by the analyse script and turn it into a trend graph and saves this graph.
Parameter --mode=native will create a trend using Python matplotlib. It is recommended to use Keen.io to generate graphs, see below for details.
If Keen.io is enabled, generate_trend.py can be run without parameters.
Use the sync-buildtime-trend-with-gh-pages.sh script when you run it as part of a Travis CI build. See below for details.
Store build time data in xml (native mode)
(It is recommended to use Keen.io to store data and generate trends, see below)
To store data in xml, native mode needs to be enabled. The xml file is stored in dashboard/buildtimes.xml by default.
To analyse timestamps and store the analysed data :
analyse.py --mode=native
See wiki for data schema of the xml file.
To generate a chart from the data stored in the xml file :
generate_trend.py --mode=native
This will save a trend image in dashboard/trend.png
Store build time data in Keen.io
Next to storing your build time data in xml, it can be sent to Keen.io for storage, analysis and generating graphs.
Follow these steps to enable using Keen.io :
- Create a Keen.io account, if you haven't already done so.
- Create a project in your Keen.io account.
- Look up the
project ID,Write KeyandMaster keyand assign them to environment variables : export KEEN_PROJECT_ID=<Project ID>-
export KEEN_WRITE_KEY=<Write Key>(when running on Travis CI, useMaster Key, see below) export KEEN_MASTER_KEY=<Master Key>
If these environment variables are set, the scripts will detect this and use Keen.io to store data, do analysis and generate graphs.
See wiki for data schema of data sent to Keen.io.
Visualise the trends (powered by Keen.io)
Multiple trends are available when data was stored in keen mode :
Folder dashboard contains all files necessary to display the generated trends.
- Copy folder
dashboardto the desired location - Rename (or copy)
config_sample.jstoconfig.js - Edit
config.js:- add
keen_project_id(see Keen.io section above) - add
keen_read_key(see Keen.io section above, or generate a scoped read key withget_read_key.py project_name(project_nameshould be the same as the project_name used to store the data, this is usually the git-repo name, fe.buildtimetrend/python-client) - add
project_name: repo name is a good default, but it can be custom project name as well, this is only used as title on the webpage. It is not used to collect data.
- add
- Browse to
dashboard/index.html, this should display the trends
If you are building a Github repo on Travis CI, and you have gh-pages branch, you can use the script mentioned below to automatically add the right files and create the config file.
Integrate with Travis CI
You can integrate Buildtime Trend with your build process on Travis CI : install and initialise the buildtime trend scripts, add timestamp labels, generate the trend and synchronise it with your gh-pages branch.
All you need is a github repo, a Travis CI account for your repo and a gh-pages branch to publish the results.
You also need to create an encrypted GH_TOKEN to get write access to your repo (publish results on gh-pages branch) :
-
create the access token for your github repo,
reposcope is sufficient - encrypt the environment variable using the Travis CI command line tool :
travis encrypt GH_TOKEN=github_access_token - add the encrypted token to your
.travis.ymlfile (see below)
To enable integration with Keen.io, KEEN_PROJECT_ID and KEEN_WRITE_KEY should be set (see above):
- Follow the steps above to create a Keen.io account and project and look up the
Project IDandMaster Key - Assign the
Project IDandMaster Keyto the corresponding environment variables and encrypt them using the Travis CI command line tool and add it them to.travis.yml(see below) : travis encrypt KEEN_PROJECT_ID=<Project ID>-
travis encrypt KEEN_WRITE_KEY=<Master Key>Remark : Use theMaster Keyinstead of theWrite Keyof your Keen.io project, because theWrite Keyis too long to encrypt using the Travis CI encryption tool -
travis encrypt KEEN_MASTER_KEY=<Master Key>TheMaster Keyof your Keen.io project is used to generate a scoped read key
The generated trend graph and build-data will be put in folder buildtime-trend on your gh-pages branch.
The trend is available on http://{username}.github.io/{repo_name}/buildtime-trend/index.html
Example .travis.yml file :
language: python
env:
  global:
    - secure: # your secure GH_TOKEN goes here (required to share trend on gh-pages)
    - secure: # your secure KEEN_PROJECT_ID goes here (required to store data on Keen.io)
    - secure: # your secure KEEN_WRITE_KEY goes here (required to store data on Keen.io)
    - secure: # your secure KEEN_MASTER_KEY goes here (required to generate a scoped read key to generate graphs using the Keen.io API)
before_install:
  # install and initialise build-trend scripts
  # uncomment one of two options below (stable or development)
  # download latest stable release
  - git clone --recursive --depth 1 --branch release https://github.com/buildtimetrend/python-client.git $HOME/buildtime-trend
  # use latest development version (clone git repo)
  # - if [[ -d $HOME/buildtime-trend/.git ]]; then cd $HOME/buildtime-trend; git pull; cd ..; else git clone --recursive https://github.com/buildtimetrend/python-client.git $HOME/buildtime-trend; fi
  # initialise buildtime-trend scripts
  - source $HOME/buildtime-trend/init.sh
install:
  # generate timestamp with label 'install'
  - timestamp.sh install
  # install buildtime-trend dependencies
  - CFLAGS="-O0" pip install -r ${BUILD_TREND_HOME}/requirements.txt
  # install dependencies
script:
  # generate timestamp with label 'tests'
  - timestamp.sh tests
  # run your tests
after_script:
  # synchronise buildtime-trend result with gh-pages
  - sync-buildtime-trend-with-gh-pages.sh
Run sync-buildtime-trend-with-gh-pages.sh in after_script to report the gathered timestamps with the result of the build in $TRAVIS_TEST_RESULT, which comes available in after_{success|failure}. after_script is executed regardless of the build result, so after both after_success and after_failure.
To enable native mode, add -m native when calling sync-buildtime-trend-with-gh-pages.sh
Bugs and feature requests
Please report bugs and add feature requests in the Github issue tracker.
Credits
For an overview of who contributed to create Buildtime trend, see Credits.
Contact
Mailinglist : Buildtime Trend Community